Installation Guide for Sew-in Hair Extensions
Sew-in hair extensions take a lot of time in installation. We have some tips to save your time.
Getting hair extensions is an exciting and fun experience. If you are searching for that semi-permanent hair look, sew-in hair extensions are one of the easiest and safest methods to get hair installed.
Let's see what you need to do to get the installations in the easiest way possible.
Here are the steps below for installation of sew-in hair extensions.
Step 1: Decide bundle Type
Step 2: Purchase Hair Bundles
Sew-in hair extensions are with you for a longer amount of time. That is why it is important for you to purchase bundles that look similar to your expectations in terms of texture and hair pattern.
You also have to make sure that you buy a quality hair that is easily wearable, manageable and versatile.
Characteristics of Good Sew-in Hair Bundle
The characteristics of good extensions is that they are made of:
Human Hair
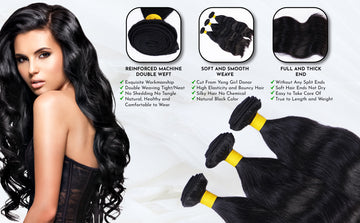
The good quality sew-in hair extensions are made of human hair. They look natural and do not look shiny like synthetic threads. When you wear them, others do not see the extensions as they blend in with your own hair.
Virgin Hair
You should buy bundles that are untreated which means virgin hair. When you buy virgin hair extensions, it makes it easy for you to style or dye them to get the desired result.
Remy Hair
The Remy hair is the one where all the cuticles and roots are aligned in the same direction so that when you wear your sew-in hair extensions, they fall in the same direction, preventing tangles.
Strong Weft
The wefting should be strong and double reinforced with short beards.This way when you get your sew-in hair extensions installed, the strands do not shed off after installation.
Step 3: Wash And Condition Your Hair
Step 4: Do Hair Partitions
So after you have washed and conditioned your real hair, detangled and blow dried, make small partitions on your head for the cornrows. You can do the partition with the help of a rat tail comb.
Step 5: Braid Cornrows
Step 6: Sew-in the Hair
Once your cornrows are done and intact, it is time for you to get your sew-in hair extensions installed. To sew your extensions with your cornrow braids you have to sew through your weft with the help of a needle and thread.
Make the first knot to secure the nook. Once done keep following the same process of stitching your weft with your cornrows so that the extensions get installed on your head.
Step 7: Finishing
Why Sew-in Hair Extensions are Best?
Sew-in hair extensions are definitely one of the the best hair extension methods you can get when wanting semi-permanent change. When you have sew-in hair extensions, the benefits are:
Easy To Maintain
Sew-in hair extensions are easy to clean and maintain as they just act like your real hair. You can wash them and keep your scalp and extensions clean.
Easy To Style
Added to your own hair the plus is in length and/or volume. You also have the option to style them the way you want with any kind of partition.
Semi-Permanent
These hair extensions could be with you day and night. They can stay with you ranging from 6 to 12 weeks .
Sew-in hair extensions are installed by sewing or weaving. It keeps your hair protected, your scalp healthy and the installation process does not involve any hair pulling or glue.
Weaving hair extensions are one of the convenient ways to transform your looks. As easy as it is to get your hair transformed, the most difficult is deciding what kind of hair installation is best for you.
Sew-in hair extensions provide you with a very comfortable installation experience. Gara Hair offers remy hair bundles which are suitable for sew-in hair extensions.

